
Intro of Centrifuge
Hello readers, I’m Md Saiful Islam and I’m a paramedic. I’ll be demonstrating how to use a centrifuge when you first go to use a centrifuge.
There is a series of buttons on the front. And the one that you need to know the most about are simply open. And that opens the centrifuge. There is a stop button which you would press if you need to terminate the centrifugation. And also a start button when you want to start the centrifugation. The rest of the buttons on the panel are used to set the speed the time. And the temperature of the centrifuge and these should already be set for you.
However it really does not hurt to check. Because sometimes the centrifugation speed and time and temperature changes throughout the laboratory activity. So in this case you can see that it may be you can see it says speed 2500. That’s 2500 rpms, the time is set to 1 minute and the temperature is set to 4 degrees Celsius. If you need to change the speed. Or the time of the temperature please ask the assistance of your lab instructor. Or one of the TAS in the lab.

The Spinning bucket rotor of Centrifuge:
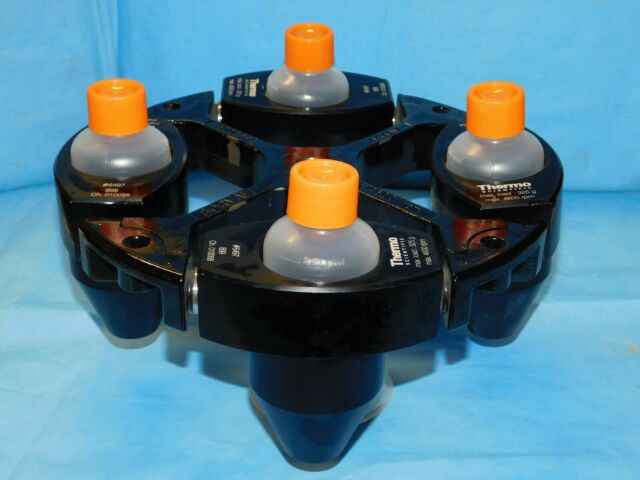
All right let’s take a look inside a centrifuge. This centrifuge has a spinning bucket rotor in it. And this particular rotor accepts bottles that contain 250 milliliters of liquid. So this rotor would accept these bottles which when placed inside would then once. It begins to spin it begins to apply a centrifugal force to the samples. And the buckets themselves begin to fly out similar to a carnival ride.
Now whenever you play samples into a centrifuge you they must be balanced. That is the two bottles that you put opposite each other in the centrifuge have to have the same weight. And this weight needs to be with the caps. The easiest way to do this is to simply weight the bottles on electronic balance. And bring the bottle that has the least liquid are the least weight up to the weight of its counterpart.
when you balance the centrifuge you place those bottles as I said opposite each other. If you put the bottles for example as shown here that would lead to an unbalanced rotor. And would perhaps permanently damage the machine upon turning it off.
So once again bottles must be balanced that is way the same with their caps. And balanced bottles that way the same must be placed opposite each other in the centrifuge.

The Conical tubes rotor of Centrifuge:
This same rotor can be fitted with a different kind of adapter. This adapter fits 50 milliliter conical tubes. And when you place tubes and these again you want them to be opposite each other. These conical tubes must be balanced against each other. And then those balance tubes are placed opposite each other in the rotor in the same position in the rotor. This is how you would centrifuge 50 milliliter conical tubes.
Learn more about laboratory equipment.
The Swinging bucket rotor of Centrifuge:
The third set of adapters that can go into the swinging bucket rotor fits 15 milliliter conical tubes. And once again these need to be balanced. Set in opposite positions and in the same positions than the opposite sides of the rotor. This is that once again the adapter for 15 milliliter conical tube.
The Micro-centrifuge tube rotor of Centrifuge:
Firstly,
During the molecular biology portion of the laboratory you will be using micro-centrifuge tube rotor. It has the one that we use has 30 places to hold micro-centrifuge tubes. And it’s actually easy to have a create and unbalanced rotor if you’re not paying attention.
So the easiest way to do this is to put your micro centrifuge tube into one of the positions. And read what the number is in. This case the number is 1 simply add 15 to that. And that will tell you which position the tube should be on the other side.
Note that – I’m putting the hinges faced out when I place these into the rotor. So let’s try another sample let’s say I put another one here at 10. I would add 15 to that. So that means it would this the balanced set a micro centrifuge tube would go at position 25. Now this is the only rotor that actually has a lid. And you have to put the lid on after you place in your tubes.
Secondly,
You put the lid on and even though you see this thing that says push. Don’t push this is actually for removing an entire rotor instead you put on the lid. And you hold on to the rotor itself a little bit as you turn the lid. The top of the lid clockwise and it should go easily if it’s not going relatively easily. It means that it’s threaded wrong and you need to start over once you have that the top on.

Thirdly,
Now it is ready to center – so to turn on a centrifuge you simply close the lid. Now the lid has a catch. You don’t depress it very hard; it’ll grab it and bring it all the way down. Once it’s closed you go ahead and press that Start button. Now once you press Start, you must stay by the machine until it comes up to the designated speed. If there is any imbalance it will begin to make loud or alarming noises in which case. Because you are standing right next to the machine. You can go ahead and press the stop button immediately and hopefully and limit the damage. That you have done to the machine due to the imbalance.
You do need to stay by the machine until it reaches. It’s the final speed. We’re going to now have to wait until this speed has come down that centrifuge begins to decelerate. So the time is complete for the centrifuge and will begin to decelerate. And once it decelerates the lid will open up automatically. And that will allow you to take open the lid all the way and to take out your sample. Now it will continue to make this beeping sound until you press the stop button. So please as a courtesy to others when your spin is complete please press the stop to stop the beeping.
Learn more about this click the link.


