
Spectrophotometer Principle
Hello World, I’m Saiful Islam and I’m a paramedic and today I’m talking to you how to use a spectrophotometer.
The Spectrophotometer is a ubiquitously used instrument in biologically, clinically, chemically, environmentally research. A spectrophotometer is a device used to measure light at a specific wavelength. It consists of two parts: a spectrometer and a photometer. The spectrometer provides light at a specific wavelength. The photometer measures how intense the light is. By calculating the amount of light that a solution is able to absorb and applying Beer’s Law, the spectrophotometer can determine the concentration of a colored solution.
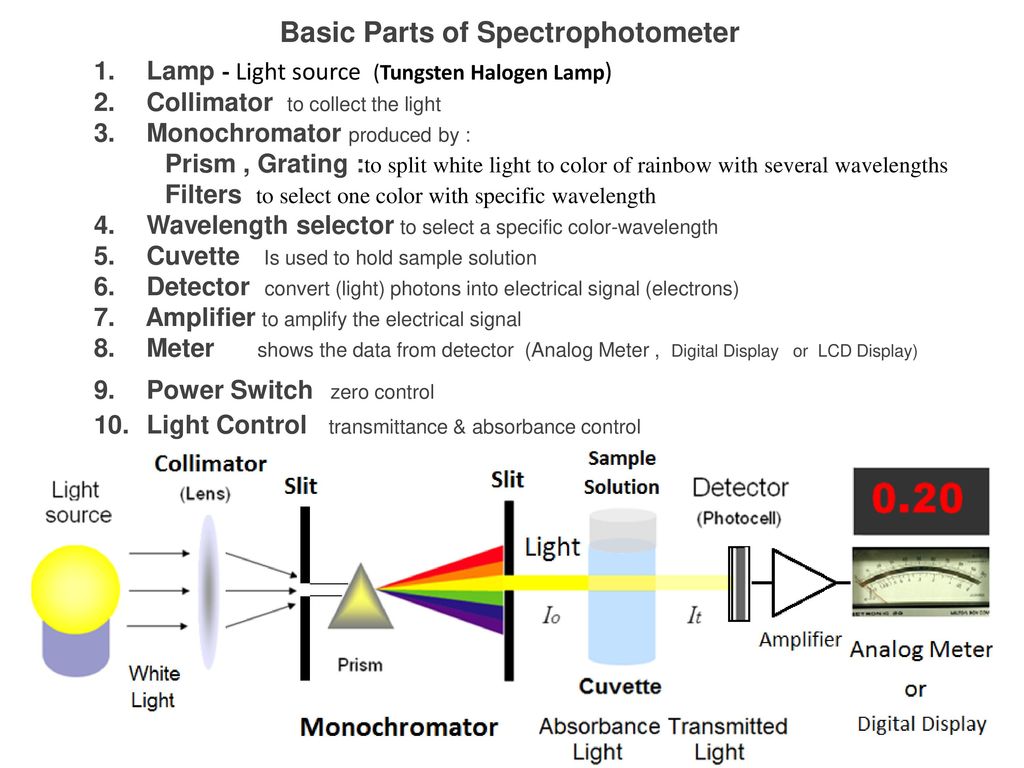
Parts of the Spectrophotometer:
- The sample compartment the lid opens and closes to picture sample inside
- The wavelength control knob to change the wavelength this is called the zero control on the left hand side
- The transmittance absorbance control on the right hand side
- Right on top is the mode select button and when you push the mode select button you’ll notice that the LED will change positions.
How to sample ready to Use
The readout to begin using the spectrophotometer and your samples is ready to use.
First
You should prepare a blank solution and the blank solution has everything in it except for the molecule or compound. You wish to measure then you should also have a tube which contains a sample which you want to measure when taking readings it’s best to go ahead and use the transmittance as the way to set up the machine.
And also to take your readings the transmittance scale is linear. It’s easy to set the zero and the 100% .
When you’re ready to calibrate the machine be sure to push the mode button several times until you have the transmittance value highlighted. Before you begin in order to start taking a reading you have to first set the Machine up. Do first thing you must do is using the wavelength control
knob and adjust the wavelength until the wavelength that you want to measure at is reached and
let’s go ahead and try taking a measurement at 420 nano-meters.
Second
Thing you need to do is using the zero control. Turn the zero control until you get zero point zero showing up on the display.
Three
Thing you should do is now open up the sample compartment and put the blank solution in we should always wipe off the bottom of your cuvettes. Before you insert them in the sheen to make sure that nothing interferes with the reading. Also notice that there’s a little line shown in the front of the cuvette line.
That up with the dash on the front of the sample compartment and then insert it all the way inside and then close the sample compartment door.
This time we’re going to use the absorbance transmittance control and turn it appropriately one way or the other until you get 100 on the dial. Once you’ve set the Machine at a 100%. Then you can go ahead and take your cuvette out and then put your sample in again making sure that you line up the mark on the cuvette with the mark on the sample compartment.
Result Analysis of Spectrophotometer
Here you can see that the transmittance value is 93.0. You can also send an absorbance reading by simply pushing the mode button to go down to where it says absorbance. when the absorbance LED is lit you can see that at the same wavelength. The absorbance is 0.032 you want to do that the Machine has to be set up specifically in order to use that option and this one is not. Do not write this concentration down and you need to know the correct factor in order to set the concentration. So ignore those just use the transmittance and absorbance on the machine.
Learn more about another laboratory equipment.
After test occur in Spectrophotometer
When you remove your sample the machine should return back to zero transmittance. You can go ahead and continue to put new samples into the sample compartment and continue to take readings at the same wavelength that you just set up the Machine. If you have ten test tubes you can now put all ten of them in one at a time and note the readings.
But once you decide that you want to record a wavelength at a different wavelength. We want to switch from 420 to 480 nano-meters. Now we have to go through the entire calibration method one more time.
Then we’ll have to begin by first changing the wavelength to the desired 480. We’ll have to zero the Machine using the zero-control knob on the left. Then we’ll have to put the blank cuvette back in and then we’ll have to use the knob on the right.
Conclusion
The absorbance transmittance control in order to set the machine back at 100% transmittance and then after that’s complete. Then you can go ahead and put your sample in to read the absorbance or transmittance at the new wavelength.
Learn More about this equipment


I have been absent for a while, but now I remember why I used to love this blog. Thanks, I will try and check back more often. How frequently you update your website?
he blog was how do i say it… relevant, finally something that helped me. Thanks
When I originally commented I clicked the -Notify me when new comments are added- checkbox and now each time a comment is added I get four emails with the same comment. Is there any way you can remove me from that service? Thanks!
Your point of view caught my eye and was very interesting. Thanks. I have a question for you.
certainly like your web site but you have to test the spelling on quite a few of your posts. A number of them are rife with spelling issues and I to find it very bothersome to inform the truth nevertheless I’ll surely come again again.
Can you be more specific about the content of your article? After reading it, I still have some doubts. Hope you can help me.
I¦ve been exploring for a bit for any high-quality articles or blog posts in this kind of space . Exploring in Yahoo I ultimately stumbled upon this website. Studying this info So i am happy to exhibit that I have an incredibly excellent uncanny feeling I discovered exactly what I needed. I such a lot without a doubt will make certain to don¦t put out of your mind this site and give it a glance on a constant basis.
Pretty! This was a really wonderful post. Thank you for your provided information.
Reading The work is like catching up with an old friend; comfortable, enlightening, and always welcome.
This was a thoroughly insightful read. Thank you for sharing The expertise!
Can you be more specific about the content of your article? After reading it, I still have some doubts. Hope you can help me.
Thanks for sharing. I read many of your blog posts, cool, your blog is very good.
Hydrochlorothiazide Dyazide No Doctor Ups Online
Having read this I believed it was rather enlightening.I appreciate you spending some time and energy to put this information together.I once again find myself spending a lot of time both reading and commenting.But so what, it was still worthwhile!
Thank you for any other informative blog. The place else may I get that type of information written in such a perfect manner? I’ve a challenge that I’m simply now working on, and I have been on the glance out for such information.
I am continuously invstigating online for articles that can aid me. Thank you!
I’ll right away grab your rss feed as I can not find your email subscription link or newsletter service. Do you have any? Kindly let me know so that I could subscribe. Thanks.
Hi, just wanted to mention, I liked this blogpost. It was inspiring. Keep on posting!
I was recommended this blog by my cousin. I am not sure whether this post is written by him as no one else know such detailed about my problem.You’re incredible! Thanks!
This put up truly made my day. You can not believe just how
Thanks for sharing, this is a fantastic article post.Really looking forward to read more. Will read on…
I really like and appreciate your article.Really thank you! Much obliged.
Thanks for the blog post. Awesome.
I loved your post.Really thank you! Fantastic.
Really appreciate you sharing this post. Want more.
I am so grateful for your blog post.Much thanks again.
Some really good info , Sword lily I found this. “Civilization is a transient sickness.” by Robinson Jeffers.
Thank you for your post.Really thank you! Much obliged.
Say, you got a nice article.Really thank you! Cool.
I cannot thank you enough for the blog article.Really thank you! Will read on…
Thanks for the post. Great.
Wow, great article.Thanks Again. Cool.
Very good article post.Thanks Again.
Major thankies for the blog article.Much thanks again. Much obliged.
Very efficiently written story. It will be beneficial to anyone who utilizes it, as well as yours truly :). Keep up the good work – for sure i will check out more posts.
That is a really good tip particularly to those new to the blogosphere. Short but very accurate information… Thank you for sharing this one. A must read article!
Really informative article.Much thanks again. Fantastic.
I think this is a real great post.Thanks Again. Keep writing.
Appreciate you sharing, great article post.Thanks Again. Really Great.
I think this is a real great article.Really looking forward to read more. Awesome.
Thanks-a-mundo for the article.Thanks Again. Want more.
Looking forward to reading more. Great blog article.Really looking forward to read more. Really Cool.
I really liked your blog article. Awesome.
Very neat blog article.Much thanks again. Great.
This is one awesome post.Really looking forward to read more. Will read on…
I do believe all of the ideas you have presented to your post.They’re very convincing and can certainly work.Still, the posts are too brief for novices. May you please prolong them abit from subsequent time? Thanks for the post.
Really appreciate you sharing this blog post.Much thanks again. Great.
Hi there! I just wish to give a huge thumbs up for the nice information you will have here on this post. I will be coming back to your blog for extra soon.
Very neat blog post. Want more.
Say, you got a nice blog.Really thank you! Keep writing.
Wow! Thank you! I constantly wanted to write on my blog something like that. Can I take a part of your post to my website?
A round of applause for your post.Thanks Again. Great.
I really enjoy the article.Really thank you! Want more.
Enjoyed every bit of your post.Much thanks again.
Say, you got a nice article.Really looking forward to read more.
hi!,I really like your writing very so much! percentage we communicate extra about your polston AOL? I need a speciallist in this space to sopve my problem.May be that’s you! Taking a look forward to see you.
Muchos Gracias for your blog post.Really looking forward to read more. Awesome.
Hello my friend! I wish to say that this article is awesome, nice written and include approximately all important infos. I’d like to see more posts like this.
I have read so many posts on the topic of the blogger loversbut this paragraph is in fact a fastidious paragraph, keep it up.
Great, thanks for sharing this article.Much thanks again. Want more.
I blog often and I seriously thank you for your content.This great article has truly peaked my interest.I’m going to book mark your blog and keep checking fornew information about once per week. I opted in for your RSS feed as well.
Very good blog article. Really Cool.
Truly when someone doesn’t know then its up to other users thatthey will assist, so here it occurs.
Your way of explaining the whole thing in this post is really good, all be capable of simply beaware of it, Thanks a lot.my blog post – male skin
Hello! I’m at work browsing your blog from my new iphone3gs! Just wanted to say I love reading your blogand look forward to all your posts! Carry on the superb work!
I truly appreciate your piece of work, Great post.Also visit my blog post; Rhino Spark Review
This is one awesome article post.
wow, awesome blog article.Thanks Again. Great.
Great, thanks for sharing this blog article.Really thank you! Fantastic.
I really enjoy the article post.Much thanks again. Want more.
I really liked your post.Really looking forward to read more. Want more.
Major thanks for the article post.
Great, thanks for sharing this blog article.Thanks Again. Will read on…
I really enjoy the post.
Im obliged for the blog. Really Cool.
more about the author academic essay writing service ace homework
Fantastic article.Really thank you! Really Cool.
provigil half life modafinil over the counter
Thanks for the post.Really looking forward to read more. Cool.
Wow, great article post.Really thank you! Great.
It’s nearly impossible to find experienced people about this topic, however, you sound like you know what you’re talking about! Thanks
This is one awesome article.Much thanks again. Much obliged.
Appreciate you sharing, great blog article.Much thanks again.
I enjoy what you guys tend to be up too. This kind of cleverwork and coverage! Keep up the terrific works guys I’ve included you guys to my blogroll.
I cannot thank you enough for the blog.Really looking forward to read more. Really Great.
Oh my goodness! Incredible article dude! Thanks, However I am having issues with your RSS. I don’t know why I am unable to join it. Is there anyone else getting similar RSS issues? Anyone who knows the solution can you kindly respond? Thanx!!
Very informative blog article.Really looking forward to read more. Awesome.
Good blog you have got here.. It’s hard to find excellent writing like yours these days. I honestly appreciate individuals like you! Take care!!
I appreciate you sharing this article.Really looking forward to read more. Really Cool.
Thank you ever so for you blog post.Really thank you!
Aw, this was an incredibly good post. Taking a few minutes and actual effort to generate a superb article… but what can I say… I procrastinate a lot and don’t manage to get nearly anything done.
Appreciate you sharing, great article post. Want more.
Hello, its fastidious paragraph on the topic of mediaprint, we all understand media is a impressive source of data.Review my blog post – pussy888apk (returnorbit.net)
I really like and appreciate your blog article.Thanks Again.
No matter if some one searches for his essential thing, therefore he/she desires to be available that in detail, therefore that thing is maintained over here.
Is there a way to send messages to each client via Bluetooth? Dacy Jessey Wilhelm
Really enjoyed this blog post.Really looking forward to read more.
Well I definitely enjoyed reading it. This article offered by you is very constructive for proper planning.
Aw, this was an exceptionally nice post. Taking the time and actual effort togenerate a top notch article… but what can I say… I procrastinate a whole lot and nevermanage to get nearly anything done.
Say, you got a nice article. Much obliged.
We wish you the continuation of your very good success gonul dagi oyunculari
This is one awesome blog.Much thanks again. Really Great.
Very good post. Much obliged.
Im thankful for the article post.Really thank you! Fantastic.
A round of applause for your article post. Awesome.
Enjoyed every bit of your article post. Much obliged.
Thanks for sharing, this is a fantastic article.Really looking forward to read more. Really Cool.
This is a really good tip especially to those new to the blogosphere. Brief but very precise info Thanks for sharing this one. A must read article!
Thanks again for the post.Thanks Again. Cool.
Really informative article.Really looking forward to read more. Want more.
Aw, this was an exceptionally good post. Spending some time and actual effort to make a top notch articleÖ but what can I sayÖ I hesitate a whole lot and don’t manage to get anything done.
I really liked your article.Thanks Again. Really Cool.
At this time it sounds like Movable Type is the preferred blogging platform out there right now. (from what I’ve read) Is that what you are using on your blog?
Aw, this was an extremely good post. Finding the time and actual effort to create a really good articleÖ but what can I sayÖ I put things off a lot and don’t manage to get nearly anything done.
Major thanks for the post.Really thank you! Want more.
I’m not sure where you’re getting your info, but good topic.I needs to spend some time learning more or understanding more.Thanks for wonderful info I was looking for this information for my mission.
I am 48 year old female Thank you so much! I love sucking dick btw hmu
When I initially commented I clicked the «Notify me when new comments are added» checkbox and now each time a comment is added I get three e-mails with the same comment. Is there any way you can remove me from that service? Thanks a lot!
I need to to thank you for this wonderful read!! I absolutely enjoyed every little bit of it. I have got you saved as a favorite to check out new stuff you post…
I was recommended this blog by my cousin. I’m not sure whether this post is written by him as nobody else know such detailed about my trouble. You are incredible! Thanks!
I truly appreciate this blog post.Much thanks again. Keep writing.
I enjoy looking through an article that will make people think. Also, thanks for permitting me to comment.
I loved your article.Really looking forward to read more. Awesome.
Really appreciate you sharing this blog.Much thanks again. Fantastic.
This is my first time pay a visit at here and i am truly happy to read all at singleplace.
Fantastic blog article.Much thanks again. Keep writing.
Really enjoyed this blog article.Thanks Again. Awesome.
Looking forward to reading more. Great post. Really Cool.
Major thanks for the blog article.
Aw, this was a very nice post. Taking a few minutes and actual effort to generate a great article… but what can I say… I hesitate a lot and don’t manage to get nearly anything done.
Thanks again for the blog post.Much thanks again. Keep writing.
I have read so many posts on the topic of the blogger lovers however this article is trulya pleasant article, keep it up.
Making hard to understand topics accessible is a talent. It’s like you’re the translator of my heart’s unspoken questions.
You’ve articulated The points with such finesse. Truly a pleasure to read.
The Writing is like a favorite coffee shop where the drinks are always warm and the atmosphere is inviting.
Thanks for the post.Really looking forward to read more.
A big thank you for your article.Thanks Again. Really Cool.
Muchos Gracias for your article post.Much thanks again. Much obliged.
nice blog~Bloghopping is really my forte and i like to visit blogs,
Thanks a lot for the post.Really thank you! Cool.
What’s up, all is going sound here and ofcourse every one is sharing data, that’s actually good, keep up writing.
It as nearly impossible to find knowledgeable people on this subject, but you sound like you know what you are talking about! Thanks
It’s great that you are getting thoughts from this article aswell as from our discussion made at this time.
Im grateful for the blog post.Thanks Again. Great.
Thank you ever so for you blog. Want more.
Im thankful for the blog article. Really Cool.
Im thankful for the blog article.Really thank you! Keep writing.
Muchos Gracias for your post.
I have read so many articles on the topic of the blogger lovers but this post is in facta nice article, keep it up.
Fantastic article post. Fantastic.
I cannot thank you enough for the post.Really looking forward to read more. Much obliged.
Thank you for your post.Thanks Again. Fantastic.
A big thank you for your article post.Really thank you! Great.
I truly appreciate this blog.Thanks Again. Want more.
I am so grateful for your blog.Much thanks again.
Really enjoyed this post.
Great, thanks for sharing this post.Thanks Again. Will read on…
It’s hard to come by experienced people in this particular subject, however, you seem like you know what you’re talking about! Thanks
Great, thanks for sharing this blog post.Thanks Again.
I cannot thank you enough for the blog.Thanks Again. Want more.
I loved your post. Want more.
Thank you for another wonderful article. Where else may just anyone get that type of information in sucha perfect manner of writing? I have a presentation nextweek, and I am at the look for such information. 0mniartist asmr
Enjoyed every bit of your blog post.Much thanks again. Cool.
Thanks for sharing, this is a fantastic blog article.Much thanks again. Cool.
I have read so many posts regarding the blogger lovers but this paragraph is actually a good piece of writing, keep it up.
Wow, great blog. Want more.
I’m really impressed with your writing abilities and also with the structure
for your blog. Is this a paid topic or did you customize it yourself?
Either way stay up the nice high quality writing.
I cannot thank you enough for the blog post.Thanks Again. Really Cool.
I really liked your article.Much thanks again. Great.
Thanks a lot for the post.Much thanks again. Awesome.
Great article post.Much thanks again. Much obliged.
Enjoyed every bit of your blog.Really thank you! Will read on…
I am so grateful for your blog.Much thanks again. Awesome.
I really like and appreciate your blog post.Thanks Again. Awesome.
A big thank you for your blog post.Really thank you! Great.
Well I definitely enjoyed studying it. This post provided by you is very useful for proper planning.
Great post and right to the point. I don’t know if this is actually the best place to ask but do you people have any thoughts on where to get some professional writers? Thanks in advance 🙂
Thanks-a-mundo for the article.Really thank you! Keep writing.
Great article post. Cool.
Simply put, just how do i search for blogs that fit what I wish to read about? Does anybody know how to CHECK OUT blogs by subject or whatever on blog writer?.
Aw, this was an exceptionally good post. Finding the time and actualeffort to generate a good article… but what can I say… I procrastinate a lot and don’t manage to get anything done.
Muchos Gracias for your article.Thanks Again. Really Cool.
Really informative article post. Want more.
Looking forward to reading more. Great post.Thanks Again. Much obliged.
WONDERFUL Post.thanks for share..more hold your fire..
Whoa! This blog looks just like my old one! It’s on a entirely different subject but it has pretty much the same layout and design. Outstanding choice of colors!
I do not even understand how I finished up here, but I assumed this post was once good. I do not realize who you might be however certainly you’re going to a well-known blogger when you are not already 😉 Cheers!
Hey! Would you mind if I share your blog with my twitter group?There’s a lot of folks that I think would really appreciate your content.Please let me know. Thank you
Thanks a lot for the post. Want more.
Hey, thanks for the post.Much thanks again. Much obliged.
Good blog you’ve got here.. Itís hard to find excellent writing like yours nowadays. I truly appreciate individuals like you! Take care!!
I want to to thank you for this wonderful read!! I certainly enjoyed every bit of it. I have got you book marked to check out new stuff you postÖ
Thanks again for the blog post.Really thank you!
whoah this blog is magnificent i love reading your posts. Keep up the great work! You realize, a lot of people are looking around for this information, you can aid them greatly.
Hi there, just became alert to your blog through Google, and found that it’s really informative. I am gonna watch out for brussels. I’ll be grateful if you continue this in future. Many people will be benefited from your writing. Cheers!
Major thanks for the article.Really thank you!
Thanks a lot for the blog.Much thanks again. Will read on…
Muchos Gracias for your blog post.Thanks Again. Much obliged.
Really appreciate you sharing this blog article.Thanks Again.
Thanks a lot for the article.Really looking forward to read more. Really Cool.
When another person writes an publish he/she retains the image of the person in his/her Mind that how a consumer can know it. Therefore that’s why this publish is wonderful. Many thanks!
At this time it appears like Movable Type is the top blogging platform out there right now. (from what I’ve read) Is that what you’re using on your blog?
Thanks-a-mundo for the article.Really looking forward to read more. Much obliged.
Piece of writing writing is also a fun, if you beacquainted with afterward you can write otherwise it is complexto write.
A round of applause for your blog.Really looking forward to read more. Much obliged.
Thanks for sharing, this is a fantastic post.Really thank you! Cool.
Thank you ever so for you blog article.Much thanks again. Fantastic.
Looking forward to reading more. Great article post.Really thank you! Want more.
Great article.Really looking forward to read more. Will read on…
Hello friends, its wonderful post concerning tutoringand completely defined, keep it up all the time.Look at my blog post … Window replacement near me bromley
Aw, this was a really nice post. Taking the time and actual effort to create a good article… but what can I say… I procrastinate a whole lot and don’t manage to get nearly anything done.
Thank you for your blog article.
Thanks for sharing. I read many of your blog posts, cool, your blog is very good.
wow, awesome article post.Thanks Again.
Very valuable information, thank you and I’d love to read more!
Major thankies for the blog.Thanks Again.
Awesome post.Really looking forward to read more. Cool.
Great blog article. Keep writing.
Wow, great blog.Much thanks again. Really Great.
wow, awesome blog.Much thanks again. Fantastic.
A fascinating discussion is definitely worth comment. I do believe that you need to write more on this subject matter, it may not be a taboo matter but usually folks don’t speak about these issues. To the next! Many thanks!!
Muchos Gracias for your blog article.Really thank you! Keep writing.
I truly appreciate this article.Much thanks again. Really Great.
A motivating discussion is worth comment. There’s no doubt that that you should publish more on this subject matter, it might not be a taboo matter but usually people don’t talk about such topics. To the next! Best wishes!!
Thanks for another fantastic article. Where else could anybody get that kind of information in such an ideal way of writing? I’ve a presentation next week, and I’m on the look for such information.
There’s definately a lot to learn about this subject. I love all of the points you’ve made.
My brother recommended I might like this blog. He was entirely right.This post truly made my day. You cann’t imagine just how much time I had spent for this info!Thanks!
Good way of telling, and pleasant paragraph to obtain facts regarding my presentation subject matter, which i am going to present in institution of highereducation.
Good info. Lucky me I ran across your blog by chance (stumbleupon). I’ve book marked it for later!
Itís hard to find experienced people for this topic, but you sound like you know what youíre talking about! Thanks
Thank you for the good writeup. It actually was aentertainment account it. Look complex to more added agreeable from you!However, how could we communicate?
I truly appreciate this blog.Much thanks again. Fantastic.
Hello, yes this post is in fact fastidious and I have learned lot of things fromit regarding blogging. thanks.
What’s up, its nice post concerning media print, we all be familiar with mediais a wonderful source of information.
Thanks for sharing, this is a fantastic blog article.Really looking forward to read more. Keep writing.
Oh my goodness! Awesome article dude! Thank you, However I am having difficulties with your RSS. I don’t understand why I cannot join it. Is there anyone else getting identical RSS issues? Anyone who knows the answer will you kindly respond? Thanx!
what is an argumentative essayhow to write a 5 paragraph essayfriendship essay
I had been advisable this blog by my cousin. I’m undecided regardless of whether this write-up is created by him as nobody else know these kinds of in-depth about my challenge. You’re unbelievable! Thanks!
Thanks a lot for the blog article. Much obliged.
Touche. Outstanding arguments. Keep up the amazing spirit.
I am now not certain where you are getting your information, but good topic. I needs to spend a while finding out more or working out more. Thanks for magnificent info I was looking for this info for my mission.
Really great content. I’ll return to read more. Thank you for sharing it.
Hi there, this weekend is pleasant in favor of me, for thereason that this time i am reading this enormous educational article here at my home.
Really no matter if someone doesn’t understand then its up to other users that they will assist, so here it takes place.
I want to to thank you for this good read!!I certainly loved every bit of it. I have you saved as a favorite to check outnew things you post…
Wow, great blog article.Really thank you! Keep writing.
Hey! I know this is kinda off topic but I was wondering if youknew where I could find a captcha plugin for my comment form?I’m using the same blog platform as yours and I’m having difficultyfinding one? Thanks a lot!
What’s up, its pleasant post regarding media print, we all understand media is a fantastic source of facts.
What a material of un-ambiguity and preserveness of precious experience about unpredicted feelings.
I really liked your article post.Really looking forward to read more.
Say, you got a nice blog post.Much thanks again. Really Cool.
Thank you for your blog article.Thanks Again. Awesome.
Appreciate you sharing, great blog.Really looking forward to read more. Want more.
Fine way of telling, and pleasant piece of writing to obtain data regardingmy presentation subject matter, which i am going to deliverin college.
Hi, all is going perfectly here and ofcourse every one is sharing data, that’s truly fine, keep up writing.
Hi my loved one! I want to say that this post is awesome, great written Luxury Complex for Rent and Leasing in Kuwait come with almost all vital infos.I’d like to see more posts like this .
Thanks-a-mundo for the blog post.Really looking forward to read more. Fantastic.
wow, awesome article.Really looking forward to read more. Will read on…
Outstanding post however I was wanting to know if you could write a litte more on this topic? I’d be very thankful if you could elaborate a little bit further. Thank you!
I really liked your post. Really Cool.
Awesome! Its really awesome post, I have got much clear idea concerning from this paragraph.
Remarkable issues here. I am very happy to look your article. Thanks a lot and I’m looking forward to touch you. Will you please drop me a mail?
saifuldream2@gmail.com
It’s going to be end of mine day, except before ending I am reading this fantastic piece of writing to improve my knowledge.
I don’t think the title of your article matches the content lol. Just kidding, mainly because I had some doubts after reading the article.
Wow, great blog.Really thank you! Really Cool.
What’s up mates, pleasant post and nice urging commented atthis place, I am actually enjoying by these.
Muchos Gracias for your article post.Thanks Again. Fantastic.
A big thank you for your blog article. Really Cool.
I think this is a real great blog post.Much thanks again. Much obliged.
Good day! I know this is kinda off topic but I was wondering if you knew where Icould find a captcha plugin for my comment form? I’m using the same blogplatform as yours and I’m having trouble finding one?Thanks a lot!
Muchos Gracias for your post.Thanks Again. Keep writing.
I really like reading through an article that can make men and women think. Also, thanks for allowing for me to comment!
Really nice design and good content material , practically nothing else we need : D.
I loved your blog article.Much thanks again. Keep writing.
I really like gathering utile information , this post has got me even more info! .
You actually revealed that adequately. modafinil vs adderall
Thanks for the blog.Thanks Again. Will read on…
Really enjoyed this blog article.Thanks Again. Want more.
Aw, this was an incredibly good post. Spending some time and actual effort to generate a top notch article… but what can I say… I put things off a whole lot and don’t manage to get nearly anything done.
Heya i’m for the first time here. I found thisboard and I in finding It really helpful & ithelped me out a lot. I hope to present something again andaid others such as you helped me.
Fantastic blog article.Really thank you!
Im grateful for the blog article.Thanks Again. Much obliged.
I’d should examine with you here. Which isn’t one thing I usually do! I take pleasure in reading a submit that will make people think. Also, thanks for allowing me to remark!
This is one awesome blog article. Really Great.
Im thankful for the article.Much thanks again. Really Great.
You could definitely see your enthusiasm in the article you write.The world hopes for even more passionate writers like you who aren’t afraid to say how they believe.At all times go after your heart.
Im obliged for the blog.Thanks Again. Much obliged.
Hello friends, its fantastic post concerning cultureandfully defined, keep it up all the time.Also visit my blog – Botanical Farms Reviews
I truly appreciate this post.Really thank you! Keep writing.
Very neat article.Much thanks again. Really Great.
Thanks for sharing, this is a fantastic blog.Really looking forward to read more. Really Cool.
A round of applause for your article post.Thanks Again. Fantastic.
I really like and appreciate your article post.Much thanks again. Much obliged.
I cannot thank you enough for the blog post.Thanks Again. Fantastic.
Looking forward to reading more. Great blog post. Cool.
Hi there, always i used to check blog posts here in the early hours in thedaylight, since i like to learn more and more.
Aw, this was an extremely nice post. Taking a few minutes and actual effort to produce a great articleÖ but what can I sayÖ I put things off a whole lot and never seem to get anything done.
Looking forward to reading more. Great blog post.Really looking forward to read more. Really Great.
Appreciate you sharing, great blog article.Much thanks again. Really Great.
This is one awesome blog post.Really looking forward to read more.
I value the blog article.Really looking forward to read more. Will read on…
It’s hard to come by well-informed people in this particular subject, however,you seem like you know what you’re talking about! Thanks
Im obliged for the blog.Really thank you! Will read on…
I really like and appreciate your blog.Really looking forward to read more. Really Great.
I value the post.
Really informative article.
Im grateful for the post.Really looking forward to read more. Fantastic.
Hi! I could have sworn Iíve been to this blog before but after going through many of the posts I realized itís new to me. Nonetheless, Iím definitely delighted I discovered it and Iíll be book-marking it and checking back frequently!
I cannot thank you enough for the blog.Much thanks again. Great.
Really appreciate you sharing this article.Really looking forward to read more. Great.
Thanks for the article. Awesome.
Hello! Do you use Twitter? I’d like to follow you if thatwould be okay. I’m definitely enjoying your blog and look forward to new posts.
Thank you for your blog.Thanks Again. Really Great.
I will make sure to bookmark it and return to read more of your useful information.
Thank you for sharing your thoughts. I truly appreciate yourefforts and I will be waiting for your further post thanks onceagain.
I truly appreciate this blog article. Great.
Now I am ready to do my breakfast, when having my breakfast coming again to read further news.
Exceptional post however I was wanting to know if you could write a litte more on this topic?I’d be very thankful if you could elaborate alittle bit further. Appreciate it!
Great, thanks for sharing this blog post.Much thanks again. Fantastic.
I really like and appreciate your article.Thanks Again. Really Cool.
Really informative blog.Really looking forward to read more. Really Cool.
Major thanks for the post.Thanks Again. Really Cool.
Wow, great blog.Really looking forward to read more. Really Great.
Awesome article. Great.
Very good blog article.Really looking forward to read more. Really Great.
wow, awesome blog article.Thanks Again. Will read on…
Hi there friends, how is the whole thing, and what you would like to sayregarding this article, in my view its truly amazing for me.
Exactly what a man of power! You have the power to publish great points that you can’t locate anyplace. to envy
to your feed and I hope you write again very soon!
Really enjoyed this article post.Thanks Again. Really Great.
My brother recommended I might like this blog. He was entirely right.This post truly made my day. You cann’t imagine just howmuch time I had spent for this info! Thanks!
Excellent article. I am dealing with a few of these issuesas well..
This is one awesome blog article.Really thank you! Cool.
Wow! This blog looks exactly like my old one! It’s on a totally different subject but it has pretty much the same layout and design. Excellent choice of colors!
What’s up, the whole thing is going well here and ofcourse every one is sharing facts, that’s genuinely fine, keep up writing.
Very neat article.
I truly appreciate this blog article.Much thanks again.
Exceptional post however I was wanting to know ifyou could write a litte more on this topic? I’d be very thankful if you could elaborate a littlebit more. Thank you!
This was a really cool blog post. Thank you for writing it.
Asking questions are in fact fastidious thing if you are not understanding something totally,but this article provides good understanding yet. 0mniartist asmr
I was suggested this blog by my cousin. I’m notsure whether this post is written by him as nobody else know such detailedabout my difficulty. You are wonderful! Thanks!
Fantastic blog article.Much thanks again. Want more.
Amazing facts. Thank you!writing a how to essay college essay for sale dissertation writing services usa
Your mode of explaining everything in this paragraph is trulynice, every one be capable of without difficulty know it, Thanks alot.